So, we made you a snazzy, new WordPress website - it's like the digital version of that new car smell, right? But now, you want to know how to take it for a spin without ending up in the digital equivalent of a fender-bender. No worries, this post is like your driver's ed for your website. We'll walk you through the ABCs of making small tweaks to your site without turning it into a hot mess.
We make all of our websites in a way that YOU will be able to edit them easily. Seriously, we don't want you reaching out to us for every little change you need when you can easily do it (though, we're more than happy to help - check out our maintenance package). Not only do we train you on how to use your website, we also have a few guides to help out. And this is one of them!
Why We Use WordPress and WPBakery
As a web design company, we want our clients to have the best combination of ease of use and complexity. We've honed the software we use to work for just about ANY company.
WordPress is one of those platforms that just gets it right (and powers most of the web) - it's user-friendly, flexible, and sturdy. We've seen clients as young as 20 and as wise as 70 master it. But don't let that fool you into thinking it's overly simplistic. WordPress has some serious muscle under the hood to handle whatever you need from your site.
Then there's WPBakery, the real secret weapon when it comes to managing your WordPress site. Think of it as your website's best friend. It's a drag-and-drop page builder that takes the hassle out of building pages and posts. You can easily shuffle things around, add custom elements, and it's blazing fast. It's about making your life easier and keeping your website running smoothly. Together, WordPress and WPBakery are the dynamic duo your website needs. Trust us, you'll thank us later.
Before You Dive In: The Pre-Edit Checklist
We've all heard the saying "Look before you leap," right? Well, that nugget of wisdom is super relevant in the world of website edits, too. Here's your pre-edit safety check – think of it like your digital seatbelt.
- Backup, Backup, Backup!
Even with the best intentions, things can go sideways. And when they do, you'll be happier than a Mummer with a free cheesesteak when you realize you have a backup. It's like your digital safety net. Remember, before you make any changes to your site, always create a backup. It takes a few extra minutes but trust us, it's worth it. - Double-Check Your Data and Page
It may sound silly, but ensure you're on the right page before you start swapping things out. There's nothing worse than perfecting your edits only to realize you've been working on the wrong page! Also, make sure you have all the correct data and images ready to go. A little prep can save a lot of headaches later on. - Clone it to Own it
Not quite ready to take the leap and make changes to your live site? No worries. We've included a handy-dandy plugin that lets you clone your page for a trial run. Experiment with changes, try new things, and once you're happy, you can take those changes to the main stage.
Making Basic Changes with WPBakery
WPBakery is a powerful tool, and we're here to help you harness that power. The methods I mention below work for any page or post.
Editing Blog Posts
- Accessing Existing Posts Through WPBakery
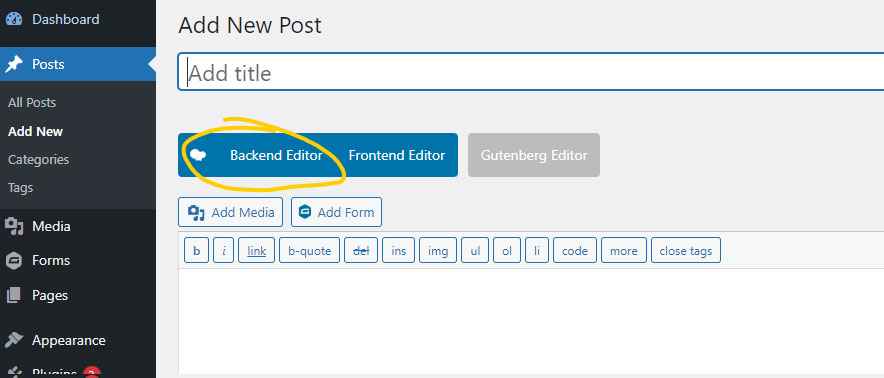
First things first, log into your WordPress dashboard. Once you're in, you'll see a sidebar with different options. Click on 'Posts', and you'll see a list of all the posts on your website. Select the post you want to edit, and it'll open up in the WordPress editor. Now, you'll see a big blue button saying "Edit with WPBakery Page Builder." Give that a click, and you're in the WPBakery editing mode.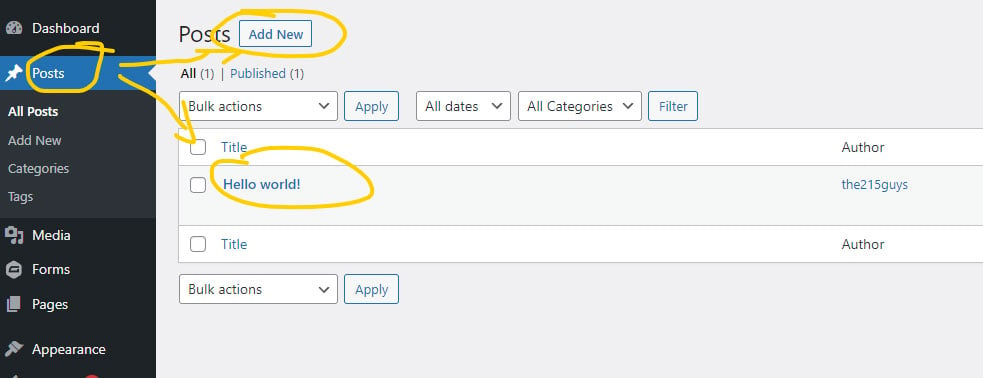
- Making Edits or Additions
With WPBakery, your blog post is broken down into different sections, rows, and elements. To edit any text, just click on the 'Text Block' element and start typing away! You can add headers, lists, links, or whatever else your heart desires.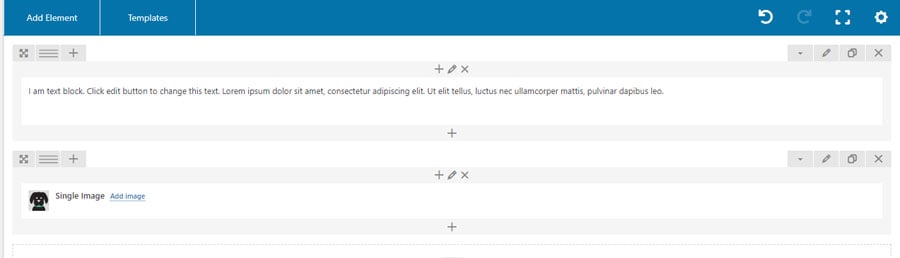
- Saving and Publishing Changes
Done with your edits? Click the 'Save Changes' button on the bottom of the element's settings pop-up. To see how your post looks, click on 'Preview'. If everything looks good, click 'Update' on the top right corner of your screen to make your changes live. Boom! You've just edited your blog post.
Changing Images
- Accessing the WPBakery Media Module
To change an image, click on the 'Single Image' or 'Image Gallery' element, depending on what you have on your page. This will open up the settings for that element. - Uploading New Images
In the settings pop-up, click on the 'Add Image' button to open up your WordPress media library. If you want to upload a new image, click on 'Upload Files' and drag your file in, or click 'Select Files' to choose a file from your computer. - Replacing Existing Images
If you're replacing an image, after clicking 'Add Image', simply select the new image you want and click 'Set Image'. Don't forget to save your changes and update the page when you're done.
Updating Product Information for E-commerce Sites
- Navigating to Product Listings Through WPBakery
To edit product information, you'll need to be in the 'Products' section of your WordPress dashboard. Click on 'Products', select the product you want to edit, and click 'Edit with WPBakery Page Builder.' - Updating Product Descriptions, Prices, and Other Details
With WPBakery, you can easily edit the product title, description, price, and more. Just find the appropriate text block or single image element and make your changes. Want to change the product image? Same as before, click on the image and replace it with a new one. - Adding or Removing Products
Adding a new product? In your 'Products' page, click 'Add New' at the top. You'll be able to fill in all the product details and add it to your site. To remove a product, go to the 'Products' page, find the product you want to remove, and click 'Trash' under its name.
Venturing Outside WPBakery: Editing Widgets, Menus, and Forms
While WPBakery handles a lot of the heavy lifting on your site, there are a few areas that it doesn't touch.
Editing Footer Information
- Accessing Widgets
Footer info, like phone numbers or your business address, are usually handled by widgets. To edit these, head over to the 'Appearance' section in your WordPress dashboard and click on 'Widgets.' - Editing Footer Widgets
On the Widgets page, you'll see different widget areas depending on your theme. Look for one called 'Footer' or something similar. Click on the widget that contains the information you want to change. This might be a 'Text' widget or a 'Custom HTML' widget, for example. - Saving Changes
Once you've made your changes, don't forget to hit the 'Save' button on the widget. You can then head over to your site and refresh the page to see your updates in all their glory.
Editing Navigation Links
- Accessing Menus
Your site's navigation links are managed through menus. To edit these, go to the 'Appearance' section again and click on 'Menus.' - Editing Menu Items
You'll see your site's menus listed here. Click on the menu you want to edit to expand it. You can change the label of a link by clicking on it to expand it, editing the 'Navigation Label' field, and then clicking 'Save Menu.' - Adding or Removing Menu Items
To add a new link, find the page you want to link to on the left, click the checkbox next to it, and then click 'Add to Menu.' To remove a link, click on it to expand it and then click 'Remove.' Remember to save your menu when you're done!
Editing Contact Forms
- Accessing Gravity Forms
Your contact forms are handled by a plugin called Gravity Forms. To access this, look for 'Forms' in your WordPress dashboard and click on it. - Editing an Existing Form
You'll see a list of all the forms on your site. Click on the one you want to edit. This will bring up the form editor, where you can click on any field to edit it. - Saving and Publishing Changes
Once you're happy with your changes, click 'Update' on the right. If you want to check your form, you can click 'Preview' to see it in action.
Common Issues Non-Experts May Encounter When Making Changes
I’ve been working with Wordpress for over 10 years - it’s second nature to me. It makes sense that someone who is new to it would see it as rocket science. Here are some common issues you might come across and how to navigate them.
Potential Problems in WPBakery
- Trouble Aligning Elements: Getting your elements to sit just right can sometimes be a bit of a struggle. Don't worry, you're not alone! Remember to use WPBakery's alignment tools and feel free to tweak until it looks perfect.
- Incorrect Image Sizes: If your images look stretched or pixelated, it could be because they're not the correct size. Be sure to check the recommended image sizes and adjust your images accordingly.
- Difficulty with Layouts: Having trouble figuring out how to create a specific layout? WPBakery comes with a bunch of pre-designed layouts that can be a lifesaver!
Consequences of Improper Changes
As much as we encourage a DIY spirit, sometimes changes made without a full understanding can lead to a few hiccups:
- Website Functionality: Incorrect changes can sometimes disrupt your website's functionality. This could be anything from broken links to features not working correctly to causing the website to not work at all.
- User Experience: Improper alterations can lead to a confusing or frustrating user experience, like difficulty navigating your site or content not displaying properly.
- Visual Appeal: Your site’s visual appeal might take a hit if changes are not made correctly. This could impact how visitors perceive your brand.
When to Seek Professional Help
While we totally support you getting your hands dirty and learning as you go, there are times when it might be best to call in the professionals:
- Major Changes: If you're looking to make significant changes to your site's structure or design, it might be best to consult a professional. They can help guide you and make sure everything goes smoothly.
- Technical Troubles: Encountering error messages or things you just can't seem to fix? No shame in asking for help. It's better to get things fixed early than to let them become bigger problems down the line.
- Time Constraints: If you're super busy and just don't have the time to learn new things, or if the changes are urgent, get in touch with a professional. After all, we're here to help!